IDEA StatiCa Connection
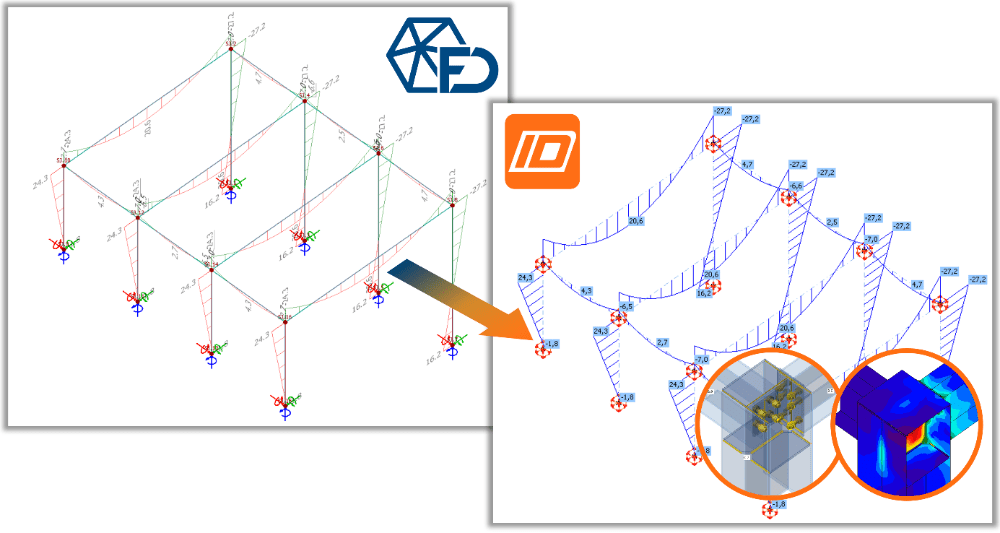
StruSoft offers a brand new tool that enables a smart connection between FEM-Design and IDEA StatiCa. The tool allows for sending 3D steel structures, or even just selected connected members and their internal forces as intelligent input for detailed design and verification of steel connections between FEM-Design and IDEA StatiCa.
This dedicated tool accelerates the finalization, detailing and documentation of steel connections thanks to IDEA StatiCa’s 250 ready connection templates and more than 10,000 configurations, as well as the optimization of fabrication and raw material costs.
Key features
- Sharing FEM-Design data with IDEA StatiCa as an input for steel connection design including:
- positions, cross-sections and materials of steel bar members,
- internal forces (normal, shear forces and moments) calculated in the members.
- Option to select which connected steel members shall be transferred to IDEA StatiCa.
- Data transfer can be done in two simple ways:
- via a live, direct link, if both programs are available on the computer, or
- via a dedicated file, if the two programs are running on separate computers.
- In case of the live connection, a single click updates the input of the IDEA StatiCa connection design based on changes in the linked FEM-Design model.
- Automatic, but editable data matching (cross-section and material) between the two programs.
- Installation of any additional programs on either side is not required.
Limitations
Connection design in IDEA StatiCa works only for straight and uniform bars.
Compatibility
- FEM-Design 22 and later version
- IDEA StatiCa 21.0 and later version
FEM-Design model-preparation
Following model preparations must be made in FEM-Design before export to IDEA StatiCa.
Run analysis for Load cases or Load combinations
Run analysis on the FEM-Design model containing steel bar elements:
- If linear calculation is suitable, run Calculate > Static and stability analysis > Load cases.
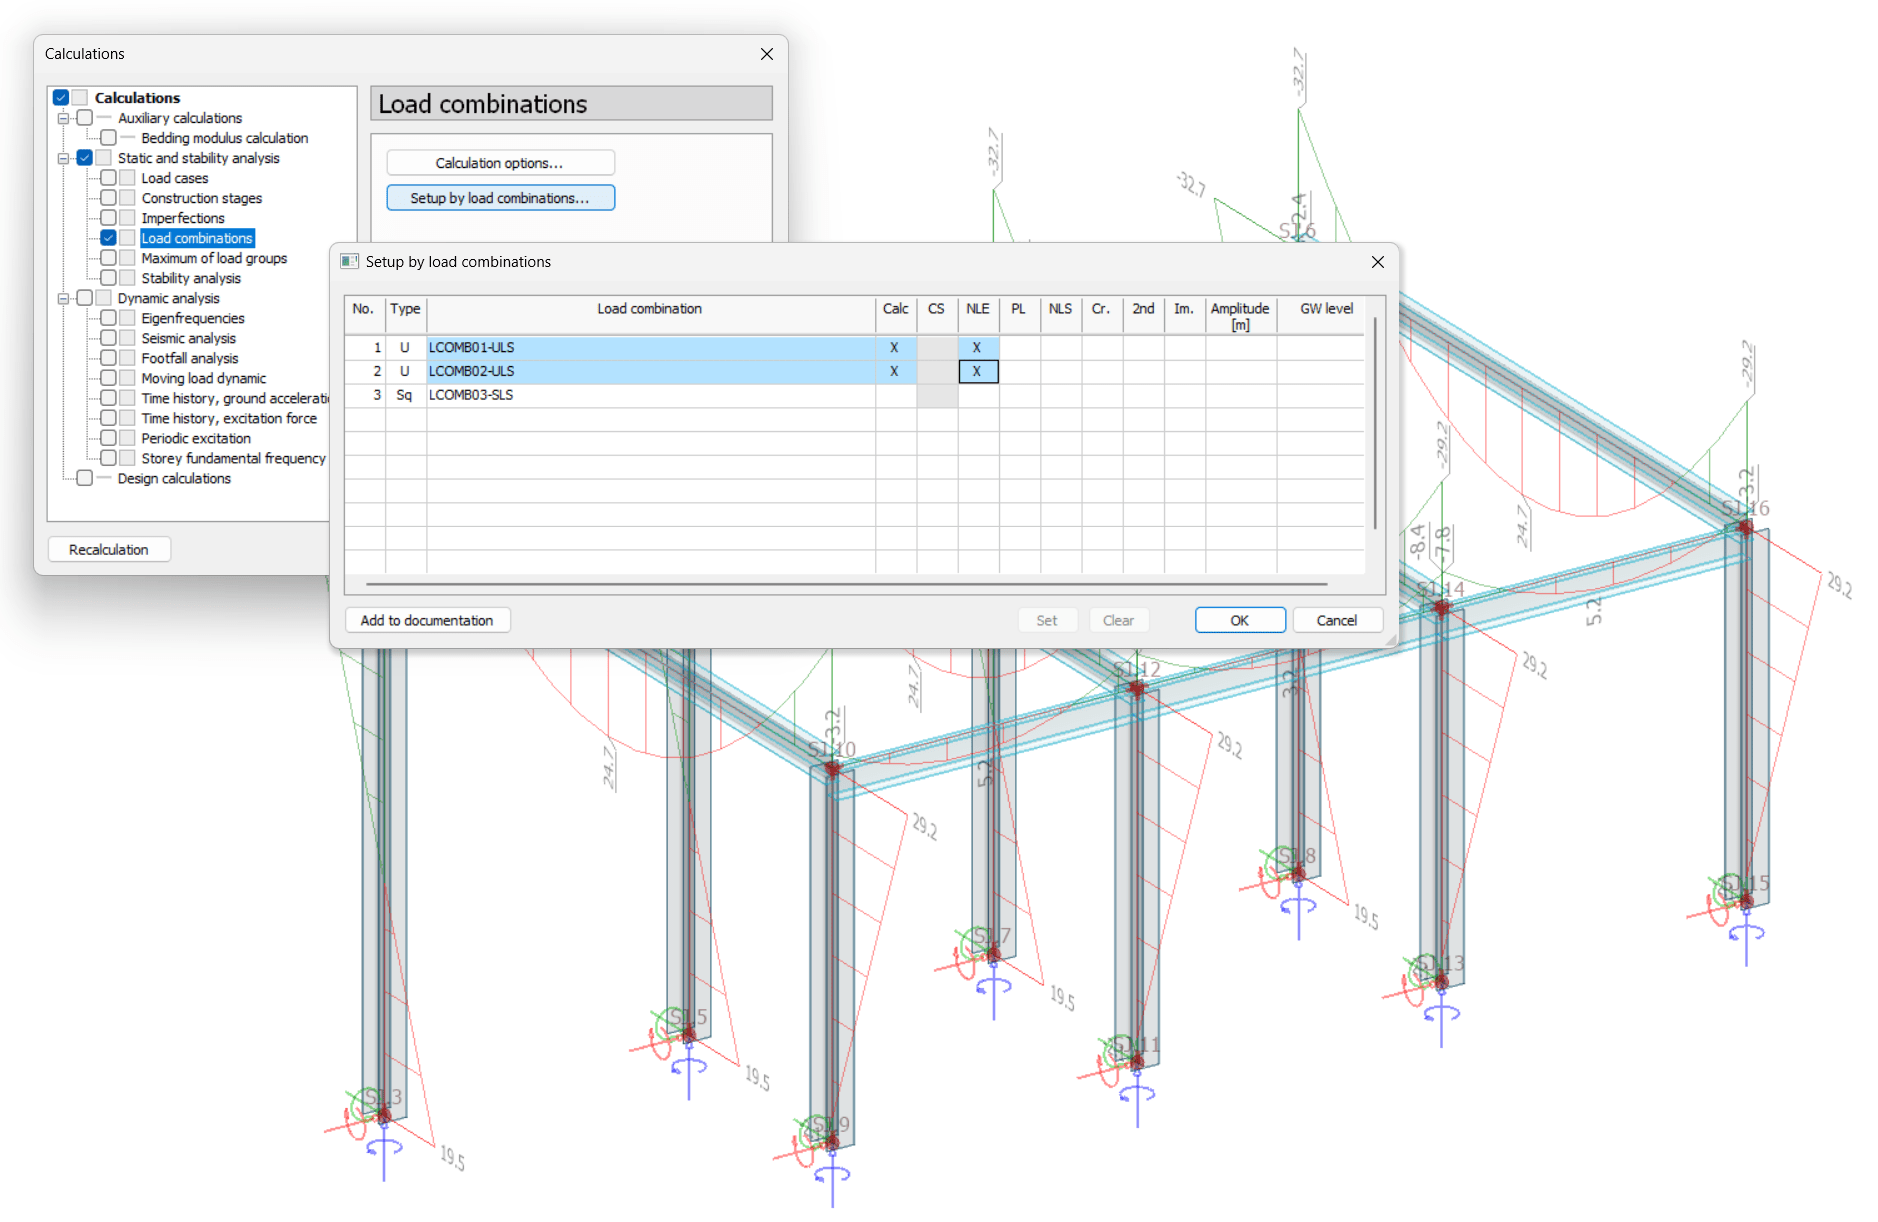
- If non-linear calculation is necessary, choose Calculate > Static and stability analysis > Load combinations and set non-linear options at Setup by load combinations.
Note: In case of linear calculations only, load case results are exported, because IDEA StatiCa can calculate load combination results and perform connection design for them.
Define Joints
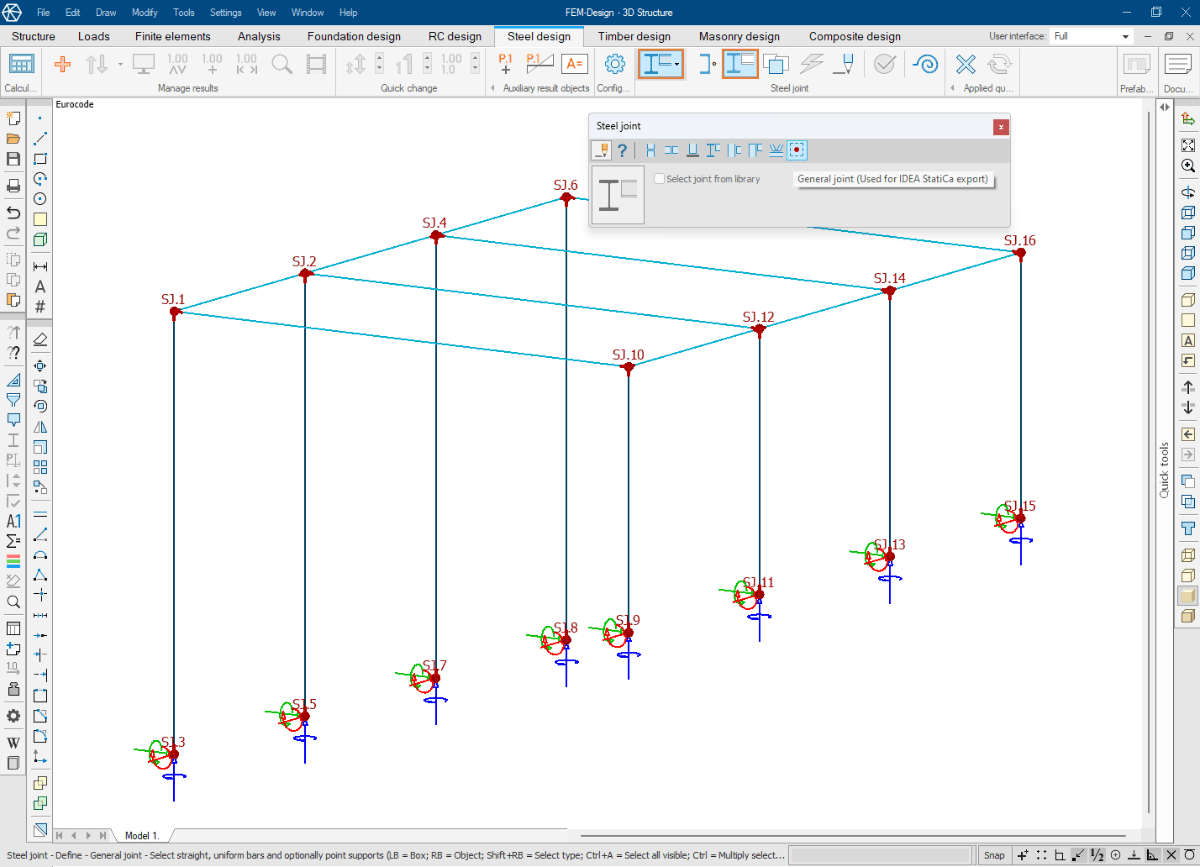
Specify the bar connections / nodes that shall be designed in IDEA StatiCa. In Steel design > Steel joint mode, use the Define joint command and create the connections using the General joint function made for the IDEA StatiCa connection. The image below shows an example where joints have been defined at all bar ends.
Notes
- Since IDEA StatiCa’s connection design works only for straight and uniform bars, the joints belonging to the bar ends are automatically deleted once the geometry of a bar is changed to a curved axis or varying cross-section.
- Regular FEM-Design Steel joints can also be exported to IDEA StatiCa.
Transfer of FEM-Design model to IDEA StatiCa
Transfer of joints, steel members and results between FEM-Design and IDEA StatiCa can be done in two ways:
- via a live, direct link – if both programs are available on the computer, or
- via a dedicated file, if the two programs are running on separate computers.
Notes
- The export process must be started from Steel design mode, where steel joints are visible and ready for selection by default. In other modes, the Steel joint, symbol layer must be activated, for the joints to be selected.
- In both cases, it is possible to decide if all joints shall be transferred, or only selected.
- Steel material and cross-section mapping between the programs is based on an editable template file: C:\Users\USERNAME\AppData\Roaming\StruSoft\FEM-Design VERSION\FEMData\saf_export_mappings.xlsx
- Unmatched FEM-Design cross-sections are assigned with a parametric description, based on which IDEA StatiCa creates the sections.
Direct (live) link
With this method, the FEM-Design export creates an IDEA StatiCa project that is ready to start working with and designing the transferred joints. The workflow is as follows:
In FEM-Design:
1. Save the current project before data transfer.
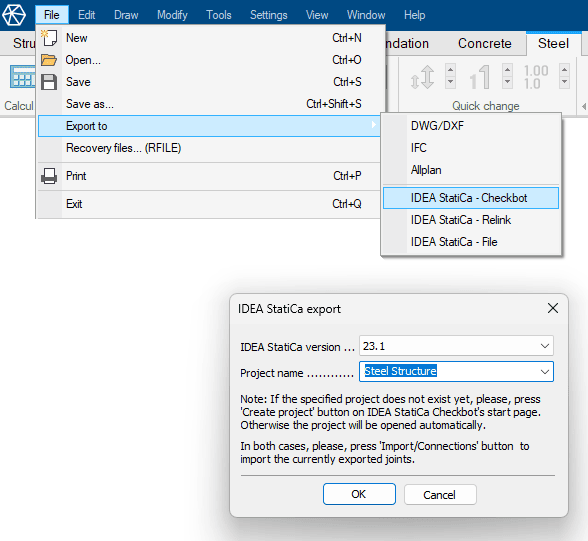
2. Run the command Export to / IDEA StatiCa – Checkbot.
3. Select the joints to be exported to IDEA StatiCa.
4. Select the version of the IDEA StatiCa.
5. Set the IDEA StatiCa project name. By default, the name of the current FEM-Design project (saved in the first step) is offered, but it is not mandatory to use it. The data structure of a new IDEA StatiCa project is created in the subfolder with its name within the folder of the current FD project.
6. Click the OK button and the IDEA StatiCa Checkbot will start.
In IDEA StatiCa Checkbot:
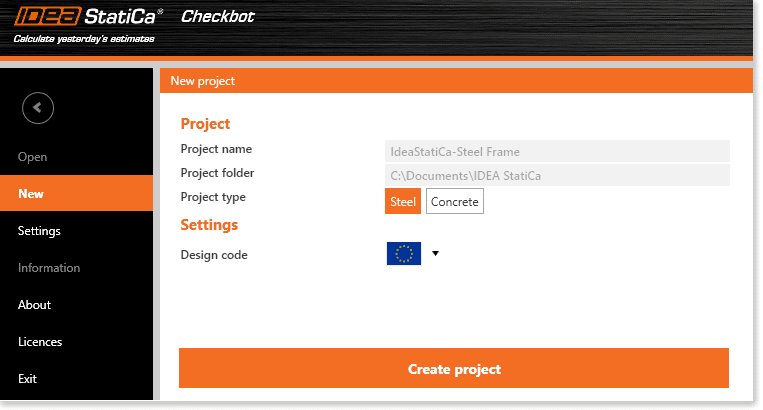
7. If the specified IDEA StatiCa project does not exist yet, one must approve its creation by pressing the Create project button in Checkbot’s New project dialog. Otherwise, an already existing project will be opened automatically.
8. Press the Connections button (Import tab) in order to load data exported from FEM-Design.
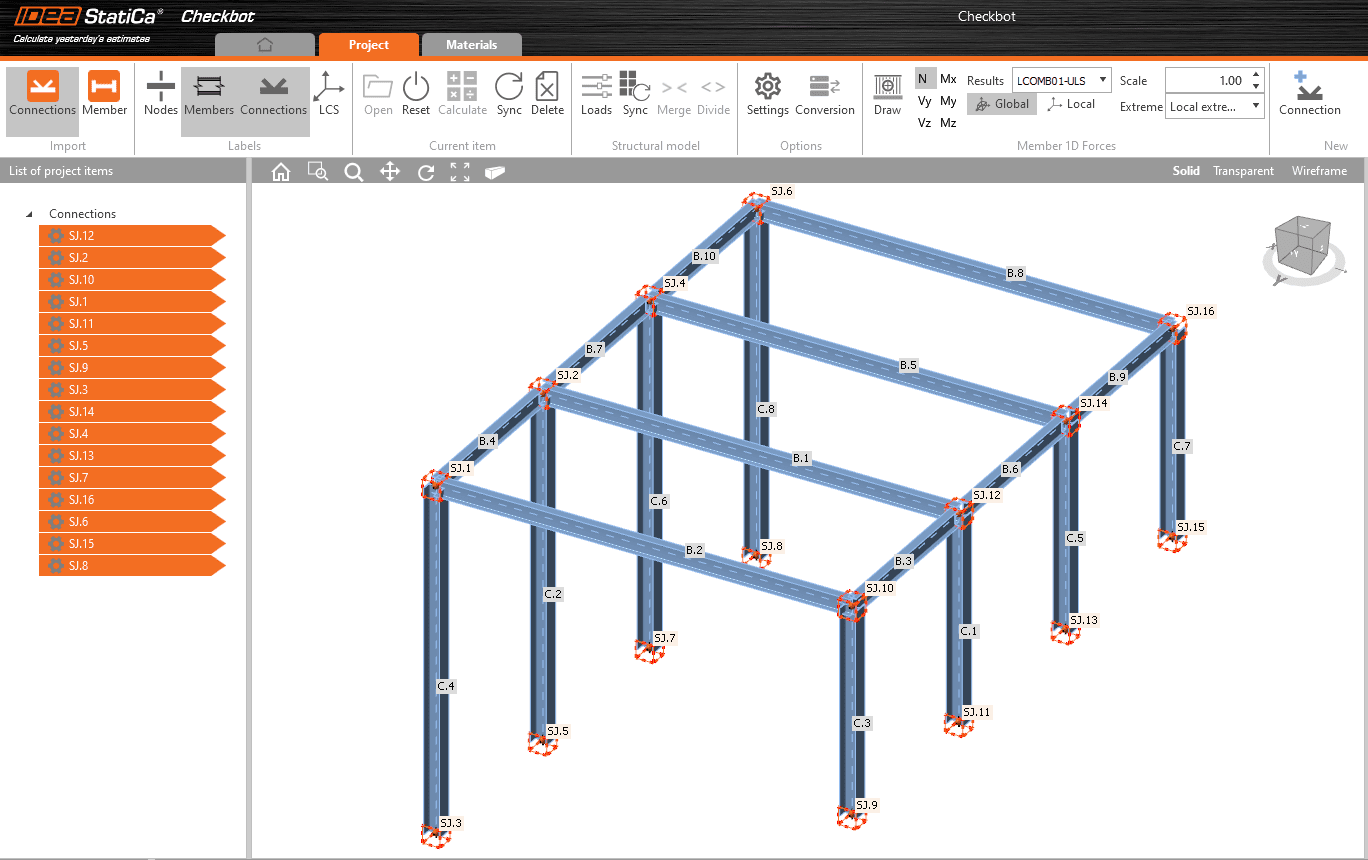
Note: In IDEA StatiCa – in the bottom right corner – the following “connection” symbol indicates that the program maintains a live link with FEM-Design. This is important for later synchronization of data. If the link is broken (for example, a program is closed), reviving the live link requires a simple repeat of the export (see Data synchronization).

File exchange
With this method, FEM-Design saves the data required for the design of selected joints in a SAF (.xlsx) file, which IDEA StatiCa Checkbot can read and easily use to build the connection design project. The workflow is as follows:
In FEM-Design:
1. Run the command Export to / IDEA StatiCa – File.
2. Select the Joints to be designed with IDEA StatiCa.
3. Save the file with a specific name and location.

In IDEA StatiCa Checkbot:
4. Create a new IDEA StatiCa project at New.
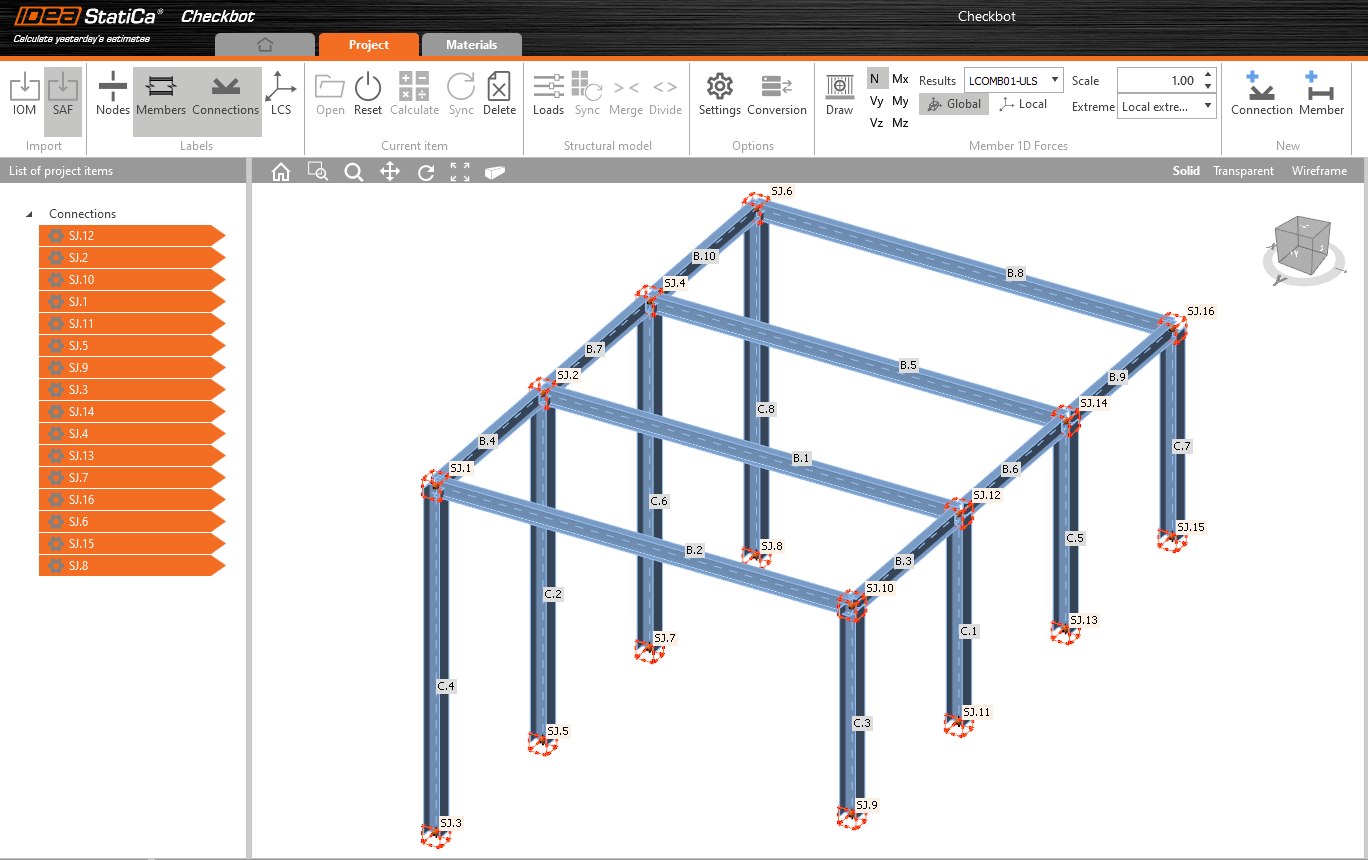
5. Open the file saved with FEM-Design using the SAF command (Import tab).

Detailed connection design (briefly)
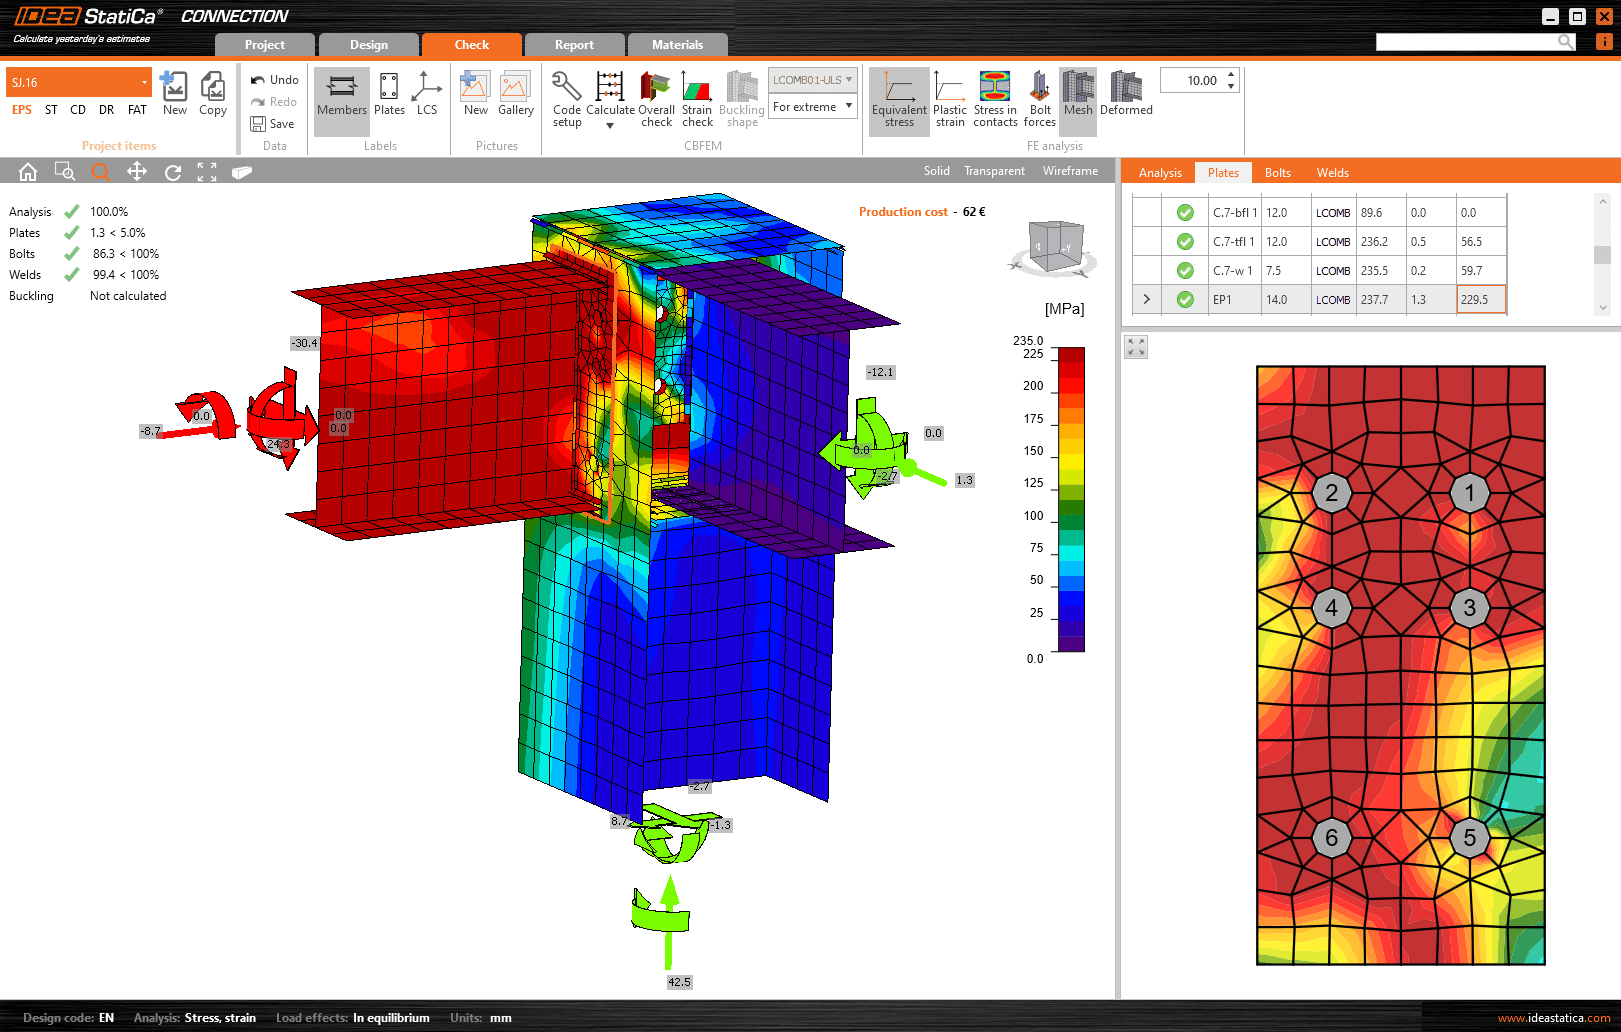
Upon finishing the transfer process, the selected objects from FEM-Design are immediately displayed on the Checkbot interface. Here, use the following tools in order to display additional data:
- Members and Connections (Labels) for displaying the identifiers of the objects specified in FEM-Design,
- Member 1D Forces for displaying the internal force diagrams showing the calculation results of FEM-Design.
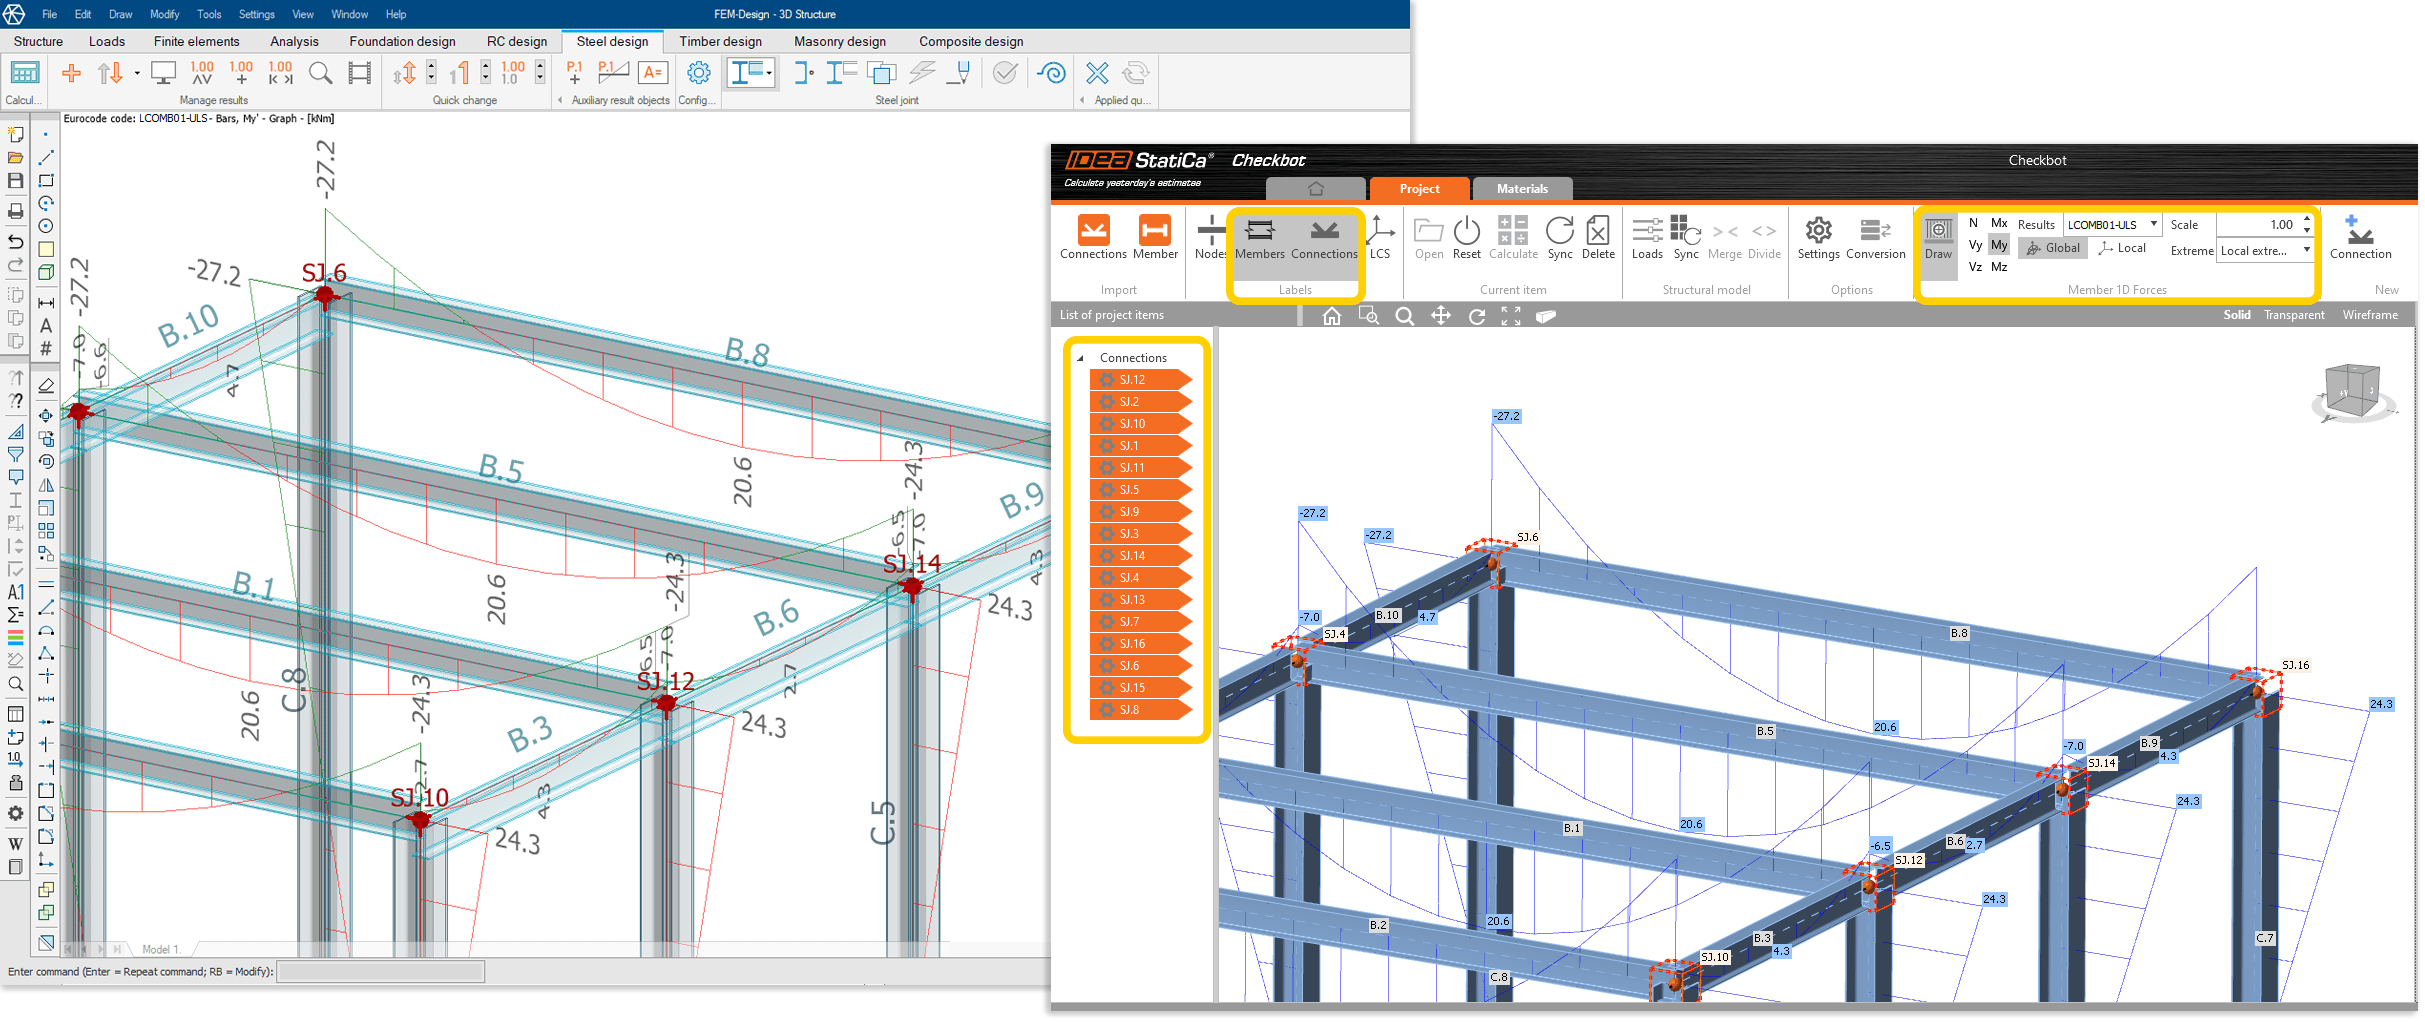
Design the connections one by one with the IDEA StatiCa Connection:
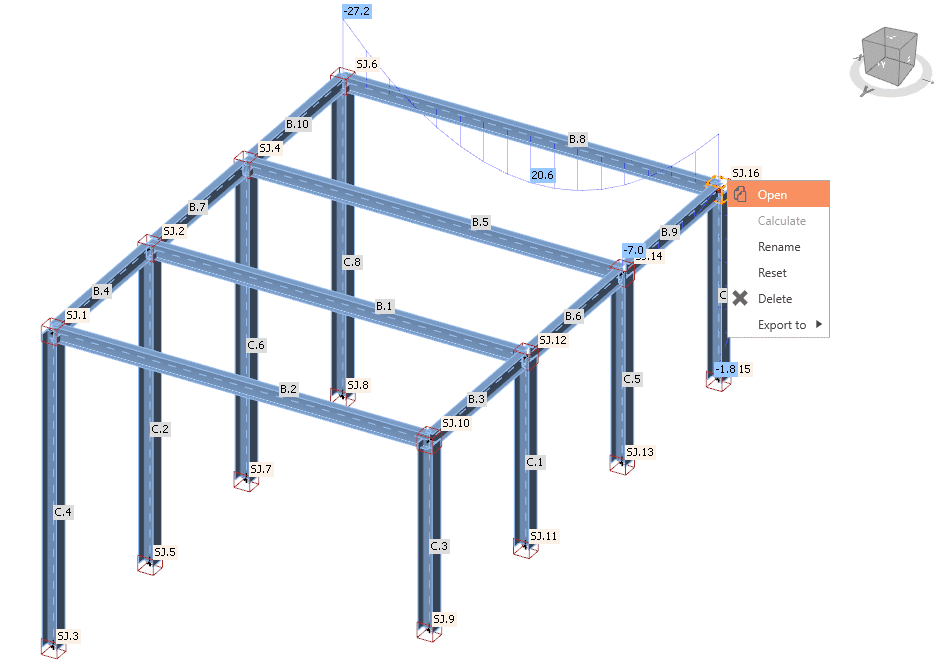
1. Use the Open command in order to send the connection to the Connection module.
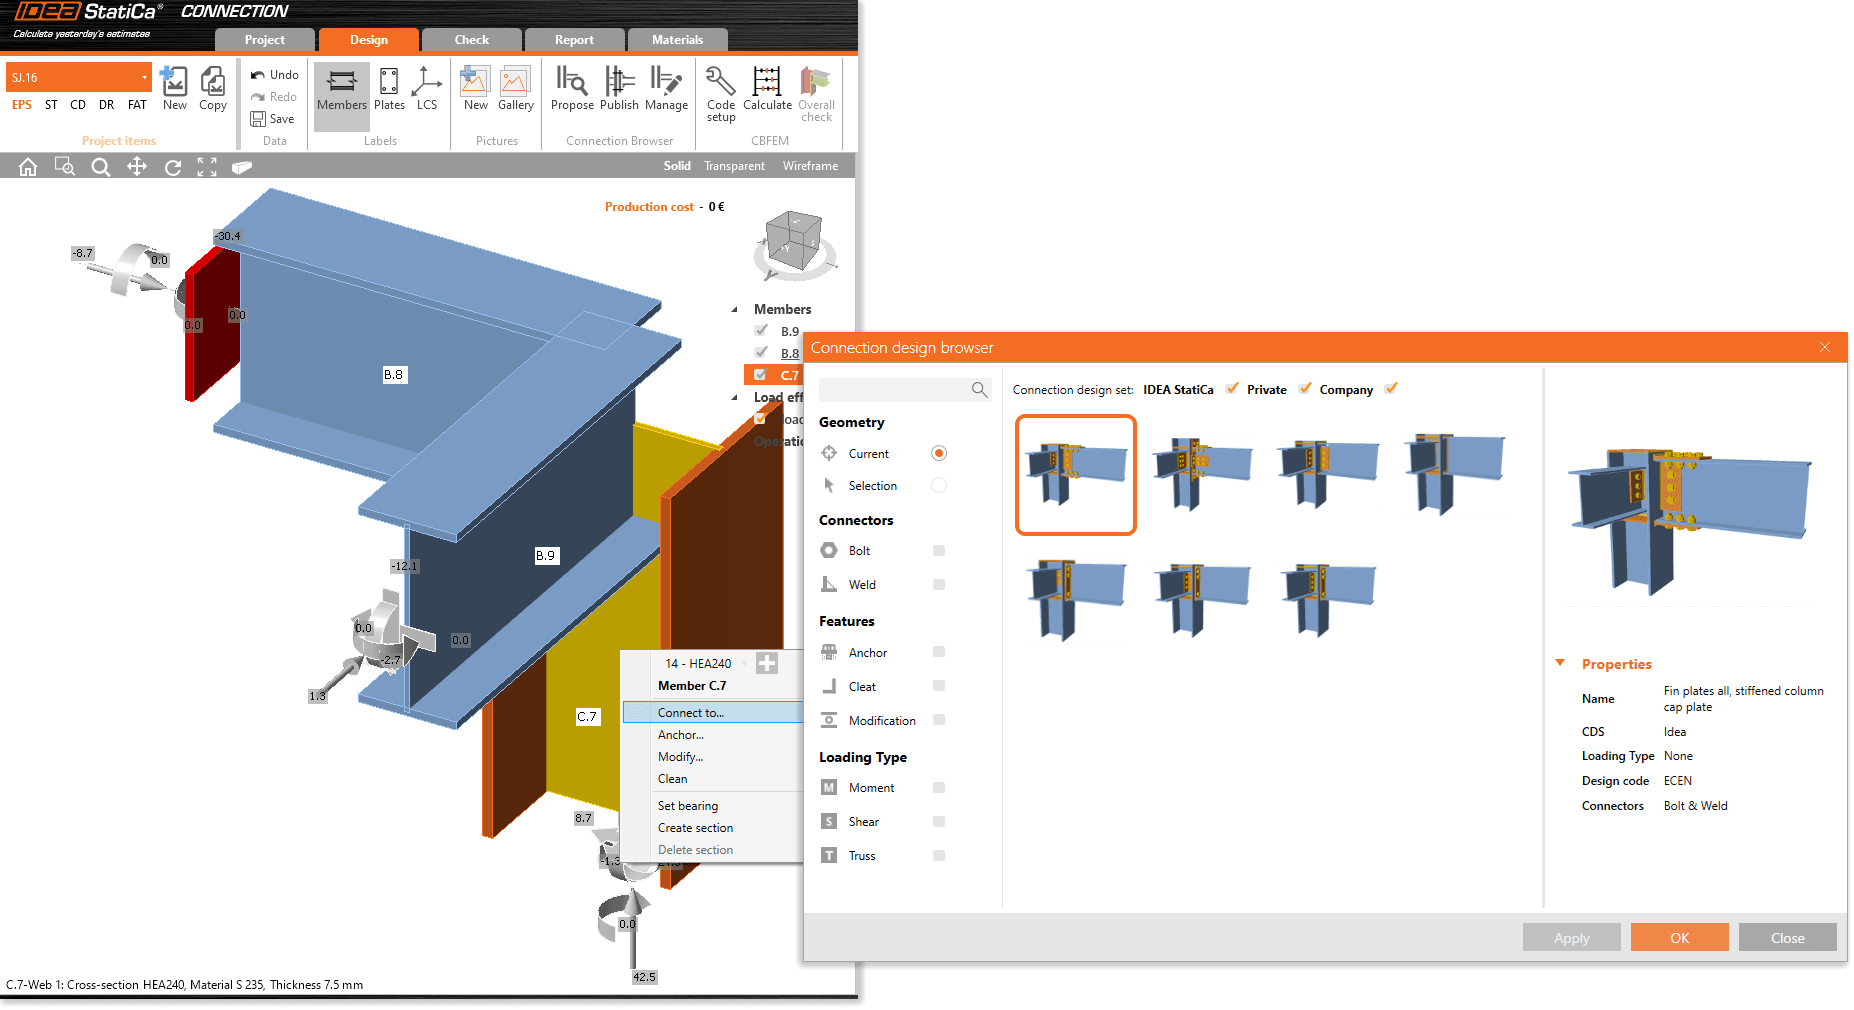
2. Specify how each member is connected to each other and with what design type.
3. Set the parameters, the sizes, the positions, and the behaviors of the assembly components such as plates, bolts and welds.
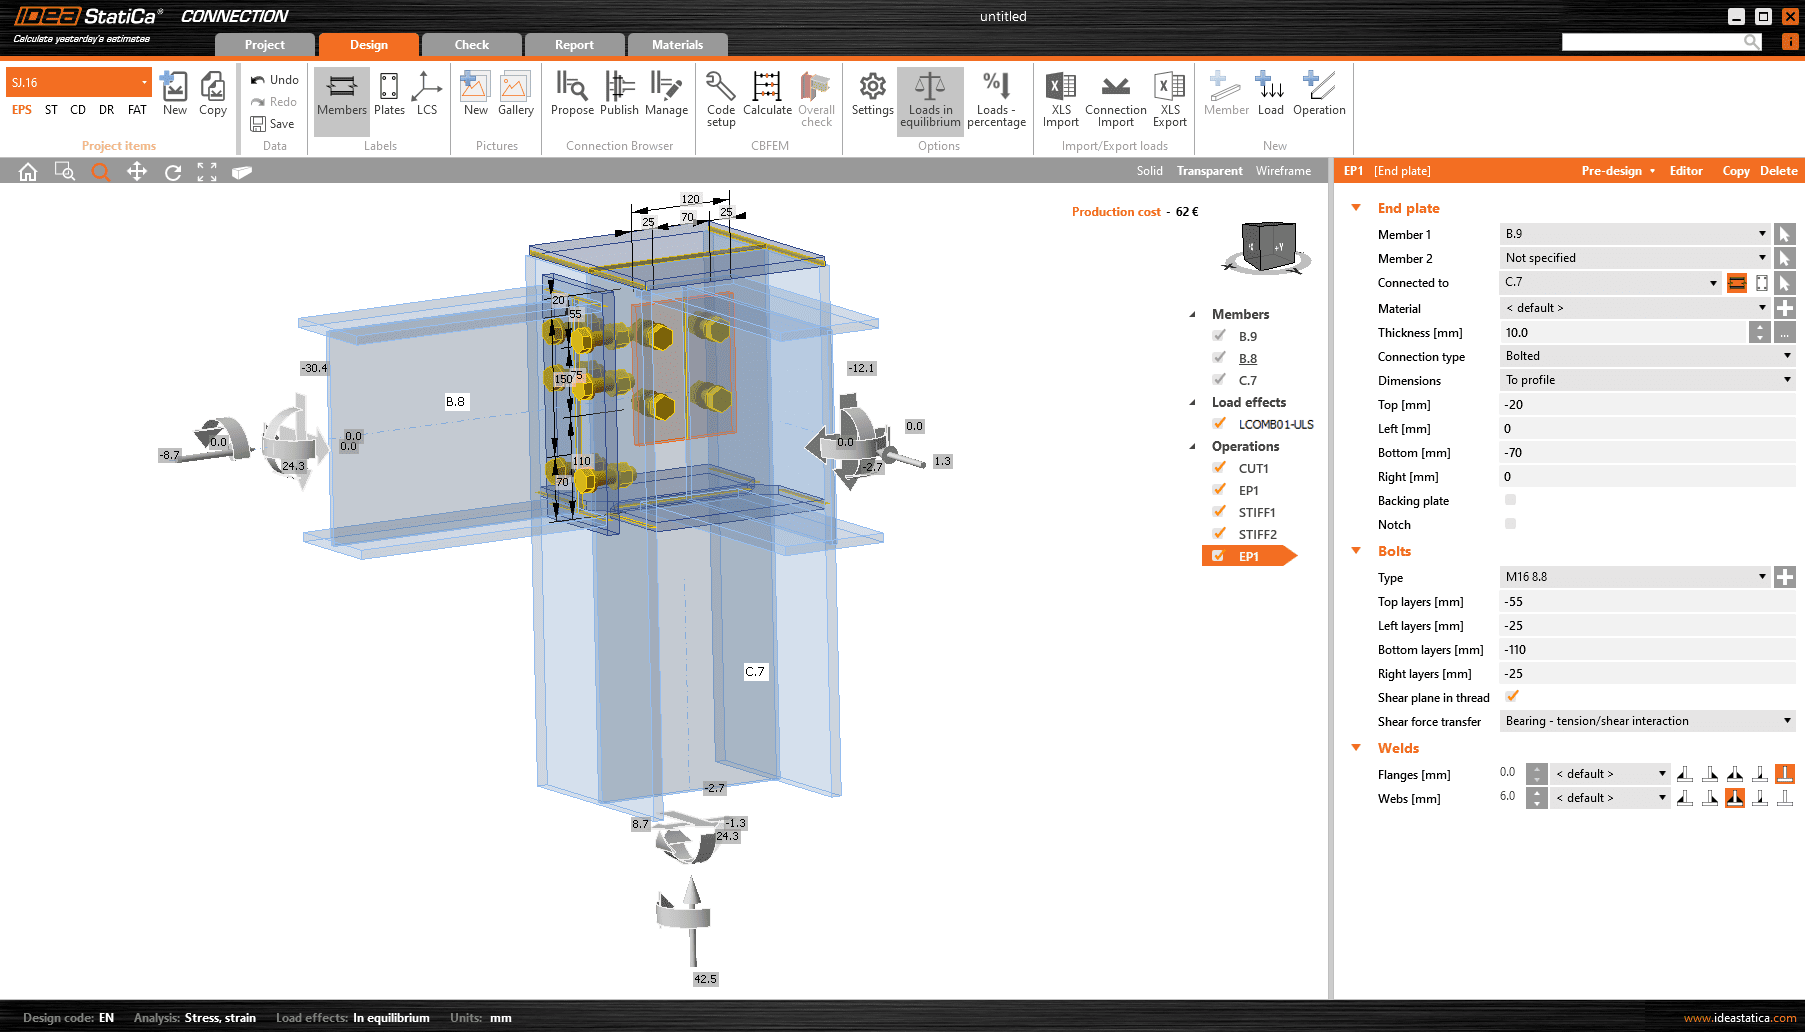
4. Analyze, check and optimize the connection until it meets the requirements. Finally, document the finalized connection type in detail.
Data synchronization
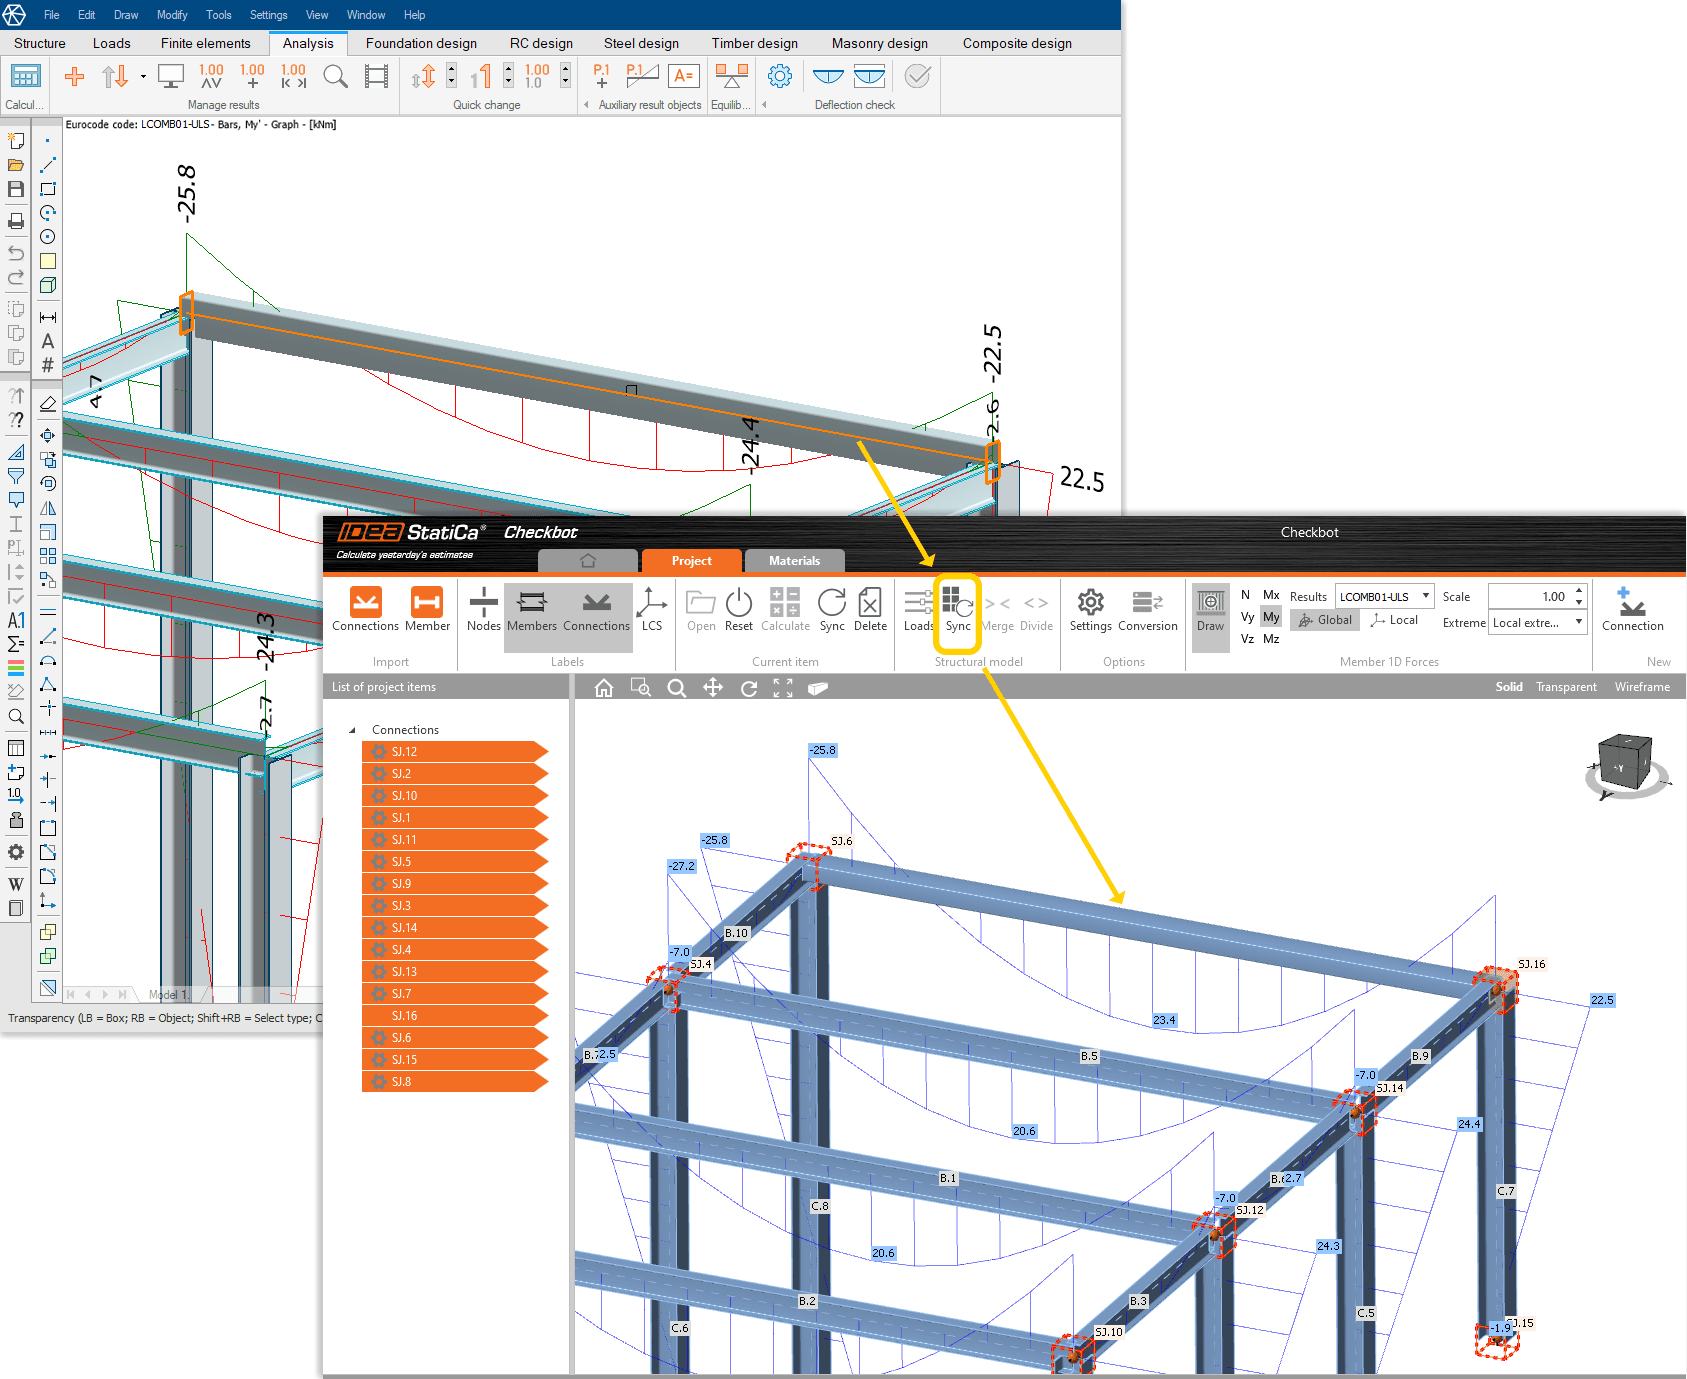
In case of a live FEM-Design – IDEA StatiCa link, there are two methods to synchronize model data changes:
A. If we want to add new connections (joint and members) from the FEM-Design model to a project already shared with IDEA StatiCa, we must apply the following steps:
- Export to IDEA StatiCa Checkbot: In FEM-Design select and export the joints including the new ones and choose the existing project name at the export settings.
- Import with Checkbot: Click the Connections function, and the new items and data are loaded.
B. If the list of previously shared joints (connections) to be tested does not change, only their position or the material/cross-section/properties of the connecting bars or the loads, then there is no need to repeat the export, the new data will be automatically synchronized by clicking the Sync button (Structural model) in Checkbot (see the next image).
Notes
- In both cases the update only works if the FEM-Design results are valid, so analysis should run after the model changes.
- If the connection between FEM-Design and Checkbot is lost/broken, or if we want to reopen the IDEA StatiCa project associated with the current FEM-Design project, use the IDEA StatiCa – Relink function (File > Export to). In the case of connections older than version 23 of FEM-Design, method A must be used for restarting the connection. In this case it is sufficient to select only one joint during the re-export.
- Relink will only work if the corresponding FEM-Design (.str) project for the IDEA StatiCa project is also saved. Before synchronizing model or calculation changes with IDEA StatiCa, it is recommended to save the current project states in FEM-Design (.str) as well.
Why wait? Download an automated 2 x week free trial of FEM-Design and get started today!
FEM-Design Wiki
Full details on the IDEA StatiCA connection can be found on the FEM-Design Wiki by clicking here.
Calculations performed according to:
Euro Code
Belgian National Annex
British National Annex
Danish National Annex
Dutch National Annex
Estonian National Annex
Finnish National Annex
German National Annex
Hungarian National Annex
Latvian National Annex
Norwegian National Annex
Polish National Annex
Romanian National Annex
Spanish National Annex
Swedish National Annex
Turkish Seismic Code
Languages supported:
English
Finnish
French
Dutch
Hungarian
Polish
FEM-Design Blog
Fast and Cost-Efficient Modelling of Wastewater and Fish Tanks with FEM-Design API
Our superuser, Igor Muždeka, Senior Technical Developer at Sweco Norway, has shared with us two great examples of structural engineering automation with FEM-Design API, [...]
FEM-Design 24 – Continuous Improvement for a Better Structural Design Experience
Enjoy a better structural design experience with FEM-Design 24, featuring usability upgrades that deliver a more streamlined workflow, an expanded plastic analysis module for [...]
We are hiring – 4 x Structural Engineering Jobs in Sweden and Denmark
Are you searching for the next step in your career in structural engineering? If you’re passionate about structural analysis, sales, and customer engagement, we [...]
